Saturday, April 27, 2013

!~!~Homemade Salsa~!~!


To me, nothing beats a great salsa recipe. It is so fresh, and  perfect when you want a snack or want to add a little spiciness to a Mexican inspired recipe.

Before I started making my own salsa, I had no idea that it was so easy! Easy is key, becuase you basically throw everything into a blender or food processer and blend away. Simple, right?!?
 

You will need:
- 2 fresh whole tomatoes sliced into pieces
- 1 small chunk of onion ( I used a slice of half a small onion)
- 1 clove of garlic
- 1/2 of a jalapeno
- a handfull of cilantro (about 15 sprigs)
- the juice from half of a large lime
- 1/4 tsp cumin (or a few shakes from the shaker)
- Pinch of salt and pepper to taste


Throw all ingredients into a food processor or blender and blend away for a minute or two. You can blend less if you want it chunky or more if you like it a little smoother.

The nice thing about this recipe is that it is adaptable to your taste buds and ingredients on hand. You can make this a tomatillo or green salsa by using tomatillos in lieu of the tomatoes.

You can add more or less of any ingredient to suit your taste buds. Add more garlic if you like it really garlicy or more jalapeno if you like it spicy. If you don't like spicy, feel free to de-seed the jalapeno and add it to the salsa so you still get the flavor without the spice.

Most importantly is to have fun with it!!! Enjoy!


Peace.Love.Lauryn

Friday, April 26, 2013

5 Natural Beauty Products I Can't Live Without

I am one of those girls that does not have much of a beauty regime. I mean, I rarely brush my hair....that's how bad it is....

I still like to take care of my skin, hair and face so I am posting about 5 beauty products I can't live without. I did have to rack my brain a little bit since I hardly ever wear makeup, and when I do its a little powder, blush and mascara. But there are things that I do on a regular basis to keep the important "beauty" parts in check.

 
1. Burt's Bees lip balm. I never leave home without it! It is a natural product that can be used anytime of the year. Burt's never goes out of style and there are no harsh chemicals. It is all natural, of course and it leaves your lips with a minty freshness after applying.


2. Alba Botanica Acne dote is a  natural face and body scrub. I will never use another facial wash ever again!! Once I found this and started using it, I was hooked. Bye Bye Breakouts!!! And I loved that you can use it as a body scrub as well.


3. Dove Body Bar. Ok, so this one does not fit the Natural list, but it really is my favorite soap of all time. My mom always bought Dove soap bars when my sister and I were little. She had terrible skin allergies and eczema and this was one of the only soaps she would use. It leaves your skin feeling so incredibly soft. I did a little testing of other soap bars, mostly all natural, but this one is by far my favorite. Not only will you smell good, but the fragrance lingers in the bathroom as well so there is no need to add fragrance sprays or plug ins in the bathroom. Saves you some money!!


4. All natural African Shea Body Butter. I actually bought this tub online. I can't remember if it was etsy or ebay, but they are easy to find. This tub has lasted me over a year and I have scraped and shared some with others by putting it in little containers for them. It is a natural moisturizer and has other healing properties. It is great for cuts, burns, dark spots and stretch marks, muscle relaxation, eczema, it can be used as a pain reliever on swollen muscles, it acts as a natural sunscreen, and can be used as hair conditioner. I will never switch back to regular body lotion. And the African shea butter will never expire!!


5. Last but not least is the Aveda Light Elements hair serum. I first discovered this when my sister worked at an Aveda Salon. She brought it home and I never stopped using it. I use it when I get out of the shower, before and after blow drying my hair and before straightening. This has done wonders for my hair's health. The serum adds shine, reduces frizz and protects your hair from well.....elements as the name suggests.

What are some of your favorite beauty products? I would love to hear about them.

Peace.Love.Lauryn

Thursday, April 25, 2013

~~ Galia Melon & Grapefruit Breakfast ~~


I saw this interesting melon at the local Trader Joes here in town and I just couldn't pass it up. Not only did it look different, but it was on sale!! Tell me it's on sale, and I will most likely go for it. :)

This melon, called a Galia Melon looked like your typical cantelope, but it was more yellowish green in color. So I did a little research and this is what I found.

Excerpt from Melissa's Produce:
Originally developed by growers in Israel, Galia melons were the first hybrid of intensely perfumed Middle Eastern melons. The Galia melon looks like a cantaloupe on the outside and a honeydew on the inside. Its light green, smooth-textured flesh, offers a delicious, sweet flavor.

 Here in Texas, we like to eat our fruit sprinkled with a little fresh lime juice and chili salt, so that is what I did. Absolutely delicious!!! Very sweet and juicy and went well with the salty chili and lime.

Also, my parents brought back some incredible grapefruits from their vacation to Florida. Of course Florida is known for its citrus. I was never a big grapefruit fan growing up, but as you evolve so do your taste buds. I have learned that as I get older I have a further understanding and respect for the foods I did not enjoy as a kid. Food is fabulous and you should always try something before you decide you don't like it.

So I grabbed one of the heavier, softer grapefruits because it seemed like it was ripe and ready to be devoured. I sliced into it and the fragrant bitter citrus smell filled the kitchen. Juice was oozing out like crazy! I could not wait to eat it! David told me that he liked his grapefruit sprinkled with a little salt. I have never tried it, so that is what I did. WOWZER!!! I have to say that I am a new grapefruit fanatic!  I don't know if the local supermarket would have grapefruits this amazing, but I bet a Farmer's Market would.

Needless to say, I had a very good breakfast this morning and I am glad I still have half of the fruit leftover to eat tomorrow!

What kind of things do you like to eat for breakfast?
Or have you tried any interesting or different fruits? There are so many out there to try!

Peace.Love.Lauryn

Wednesday, April 24, 2013

Southern Fried Chicken


Fried foods are staples in Texas kitchens. We have fried green tomatoes, fried potatoes, fried mushrooms, fried okra, chicken fried steak and of course fried chicken!!!!

My dad is ones of those cooks that loves to fry food. It's just so easy!!! Sure you have to make sure your oil is the right temperature and that you cook the food long enough, but that's it.

Chicken legs and thighs are usually the cheapest to purchase at the grocery store. Or you can choose to purchase a whole chicken and cut it up. Anything to save a few bucks, right?!

So here is my recipe for southern fried chicken. I keep it pretty simple and stick to the basics.

Step 1: You must marinate your chicken overnight in buttermilk. This keeps it tender, helps infuse flavor and keeps it nice and juicy when you cook it.
Tip: If you don't have buttermilk on hand you can substitute it with 1 cup milk and 1 Tbsp lemon juice or white vinegar. Tells you how to do it here.

So I placed my chicken legs into a glass container and seasoned with salt, pepper and paprika, then poured the buttermilk over the top to cover. Cover the container and place in the fridge overnight or for 24 hours.


Step 2: Prepare your flour mixture. Here is where you can have a little fun with the seasonings. I always use what I have on hand. So I season the flour with salt, pepper, paprika, garlic powder Cayenne and a 21 seasoning mix from Trader Joes. If you don't have that you can keep it simple or add any other herbs you have in the cabinet or fresh from the garden such as Rosemary, oregano, basil, lemon pepper and even a little tiny bit of ground ginger. Yummy!! Make sure you season the flour well so that when you fry your chicken you will be able to taste the seasonings in the breading. You can test this by tasting your flour mixture. It's just flour and seasonings. Don't be scared.

Step 3: Prepare your frying pan. If you have a deep fryer, then set that bad boy to 350 degrees. If not, then use a deep wide pan. You can see the one I used above. Fill halfway with oil, or enough to cover 3/4 of the chicken. Place your fry or candy thermometer in the oil and heat to 350 degrees.

Step 4: Take the chicken out of the buttermilk mixture keeping it nice and wet and dip it into the flour mixture. You can double dip if you want extra batter, but I only do one dip. Then set aside and dip all pieces of chicken.

Step 5: Once your oil reaches 350 degrees begin placing your chicken in the oil. Do this carefully as you don't want to be splattered with the hot oil. Fry chicken about 10 minutes on each side or until golden brown and juices run clear. You can check doneness with a fork or a meat thermometer.
Note: White meat chicken will cook faster than dark meat by a few minutes.

Once chicken is done. Place on a plate covered with a paper towel or newspaper. Let cool and enjoy!!!


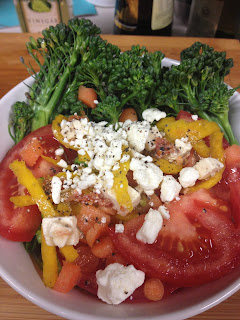
Don't worry. We didn't eat just fried chicken. I also made this AMAZING salad to go with it. I almost didn't want to eat the chicken because the salad was so good!!!


Hope you guys enjoyed the fried chicken tutorial!!
I'd like to hear about your favorite fried foods!

Peace.Love.Lauryn


Monday, April 22, 2013

* ~ Monday Night Meatballs ~ *

 It is Monday again which means Pizza Night!!!!!! Last week I demonstrated how to make pizza dough. If you missed out, you can check it out here!

It was a long weekend filled with great friends, food and fun. My sister had a huge Fiesta Party on Saturday, then it was David's Niece's 2nd Birthday Party on Sunday. There were a lot of people there playing washers, eating great food and just hanging out.

David's adorable niece  was born on Earth Day!! Earth Day fell on a Monday this year so we all gathered at Grandma and Grandpas house to celebrate. David's sister made a delicious homemade carrot, pineapple and maple cake. And I made a homemade vanilla custard to go with it. It was incredibly delicious!!! 

I absolutely love homemade cakes!!! I used to hate cake at Birthday parties, because it was always the cheap store bought cakes filled with a ridiculous amount of sugar and other things that I probably can't even pronounce. But this cake was delightful, and the vanilla custard was a perfect pairing.

Any who.......so yes, I had to ramble about the busy weekend, but today I am just happy to go home and have a quiet pizza night with the boyfriend. Laziness at last!!!

Somehow I managed to whip up some homemade meatballs yesterday evening. One of my favorite pizzas at a local pizza joint is their meatball pizza. So I thought it would be a great addition to our pizza night if I made some meatballs!!  Very excited to try this out at home!

Here is what I had on hand to put in the meatballs:


  • 1 lb. lean ground beef
  • 1/2 cup bread crumbs
  • 1/4 cup shredded Parmesan cheese
  • 1/2 medium onion, diced finely
  • 3 cloves of garlic, chopped finely
  • 1 large egg
  • 5 - 6 fresh basil leaves
  • 3 sprigs of fresh thyme leaves removed
  • 1 large sprig of fresh oregano leaves removed
  • salt and pepper to taste

  1. In a large bowl combine all ingredients
  2. Mix and roll into meatballs
  3. Heat an oven safe skillet with a little olive oil 
  4. Preheat oven to 350 degrees 

5. Brown the meatballs in the skillet, rotate meatballs and cook about 1 minute on each side until brown
 6. Cover the meatballs and place in the preheated oven
 7. Bake meatballs for about 15 - 20 minutes until cooked thoroughly
8. Take the meatballs out of the oven and enjoy or save for a future recipe

Then came the Pizza!!!!!!!!!!!!!!!!!!!!!!!!

I sliced the leftover meatballs thin, kinda like a pepperoni slice.
Gathered the pizza toppings I wanted. Fresh basil, oregano and green olives!

Enjoy!
Peace.Love.Lauryn

Sunday, April 21, 2013

Record Store Day ~ 420 ~


Yesterday was the infamous Record Store Day!!!

 Being the music junkies and vinyl hounds that we are, David and I woke up early (on a Saturday of all days) and headed down to our local record store to try and snag a few vinyls that are releasing today. There are three types of vinyl that are being released today.
  1. Record Store Day Exclusive Releases - only available at your local record store if they ordered it
  2. Record Store Day Limited Run/Regional Focus Releases - very limited editions of records also only available at your local record store if they ordered it
  3. Record Store Day First Release - The first available release of this album. May hit stores or available online in a few weeks.
Not all record stores will receive all the releases. Also, if you only have one record store in town like we do, you better get there early if there is something in particular you want to get. With only one record store and dozens of vinyl enthusiasts it's gonna be tough to get the ones you want.

The line we waited in even though we got there an hour early!


 The three vinyls we got to add to our now eclectic collection!!!


 Blind Melon - Self Titled. First release on vinyl and exclusive record store day release.

 The White Stripes - Elephant. This one was a special 10th Anniversary Release. Had to have it!!!
Dazed and Confused Soundtrack. This is another First release, as it has never been pressed on vinyl. This one was extra special as it was pressed on a weed green vinyl. Special release for 4/20. Good stuff!!! :) 

 Then after record store day, my sister was throwing a 420 / Fiesta party so of course we had to hit that up!!! They had 2 live bands play out their house in downtown SA where all the Fiesta activities were taking place this weekend. Here are a few photos.

Fiesta Flower Headress.
The band Carter played on the balacony of the 2nd story.
The band buho rocked it out inside the living room.

Needless to say, it was a great day filled with friends and some great music.

Hope you guys had a great Saturday as well!!!

Peace.Love.Lauryn

Friday, April 19, 2013

Easy Brownie Recipe

One of the easiest and quickest brownie recipes out there, plus it tastes amazing!!!

 During one of my chocolate craving episodes I skimmed through dozens of brownie recipes to finally decide on this one. One of the main reasons was because I was out of butter!!! Crazy, I know. So the particular brownie recipe I was looking for could not contain butter. Luckily enough I found this one on food.com.  I did add some chocolate chips on top of my brownies just to ensure they would be super chocolaty, but it's not necessary. :)

Do not be fooled by how simple this recipe is. 
These brownies were amazing to say the least. Soft and fudgy on the inside with a nice crackly top. Delicious!!!
This recipe was very simple and I loved that it only takes 40 minutes or less to make.

Easy Brownie Recipe:
  • 1/2 cup veggie oil
  • 1 cup sugar
  • 1 tsp vanilla
  • 2 eggs
  • 1/4 tsp baking powder
  • 1/3 cup cocoa powder
  • Pinch of salt (no more than 1/4 tsp)
  • 1/2 cup flour
  • 1/2 cup chocolate chips (optional)
  1. Preheat oven to 350
  2. Mix together the oil and sugar
  3. Add eggs one at a time and stir in the vanilla
  4. Mix all dry ingredients in a separate bowl
  5. Add the dry ingredients to the wet ingredients
  6. ***Optional: Sprinkle chocolate chips on top or add them to the batter
  7. Bake for 20-25 minutes
  8. Always give your brownies the toothpick challenge before taking them out of the oven. 
*Toothpick Challenge: Place a toothpick in the middle of the brownies and pull it out. If there is brownie batter on the toothpick, they are not quite done yet. If the toothpick comes out clean, then your brownies are ready.


So easy right!!! Enjoy!

Peace.Love.Lauryn