Saturday, October 5, 2013

Breaking Bad Season Finale Dinner Party & Chili-P Mexican Chocolate Ice Cream Recipe


So excited and sad that Breaking Bad is coming to an end. So to commemorate this moment David and I decided to host a Breaking Bad season finale dinner party this past Sunday. We usually have our friends over on Sunday's for dinner, Dexter and Breaking Bad since we record and get both Showtime and AMC, but this was one special night that we wanted everyone to remember. Here are some pictures from our last night of watching a new episode of Breaking Bad. 

I apologize ahead of time because I was a little too busy prepping, cooking and enjoying my time with friends to worry about photographing every dish and event that took place that night, but I do have a few pictures to share. 


I made Los Pollos Hermanos chicken finger baskets complete with fried chicken fingers, french fries and cheddar biscuits. I went to the dollar store in search of a few things we needed for the party, and I saw some red baskets that I knew would be perfect for serving dinner. So I used the red baskets and a pieces of wax paper for serving the chicken fingers, fries and biscuits to each of our guests. It was a lot of fun and the best part was the easy cleanup!


We had plenty of drinks for everyone to enjoy too. We made Blue margaritas for many reasons. The color blue is an obvious choice, and doing a tequila drink just makes sense. There are many times where tequila was used in the show. 


Remember when Hank, Walt and Walt Jr. were taking shots of tequilla? 


Gus also kills his long time acquaintance Don Eladio and his men with poisoned tequila.


 We also made some Walter White Russians which we thought was a fun alternative to the tequila. Then of course we had a round of blue vodka shots to kick things off. I also made some blue ice cubes, blue sugar and blue salt to go along with the drinks. Notice the funyuns in the bowl? Yup, we had those too! In the background you can see one of the chicken baskets sitting on the table.


David and I also made some blue crystal candy and printed the Los Pollos Hermanos label on some small white paper bags to look like it came from the restaurant on the show. The candy was kind of a pain in the butt, but totally worth it!! We used this recipe from Sugar Hero. I also found some little plastic jewelry bags to put the rock candy in so it looked just like a little bag of meth from the show. We were going all out since we love this show so much!


But, my favorite thing of all was the Chili-P Mexican Chocolate Ice Cream that I made. If you can remember from the very first season when Jesse was cooking meth, his signature was to put a pinch of chili powder in his product to differentiate between the other products out there. He called it Chili-P Meth. Also the Mexican drug cartel plays a huge role in the show so it fit perfectly! It seemed everyone really enjoyed the Chili-P Mexican Chocolate Ice Cream and because it is so unique, I figured it would be the perfect recipe to share with you all here. 


For the Ice Cream you will need:
- 2 cups heavy cream
- 1 cup milk (any kind, but I use 2%)
- 1 whole vanilla bean
- 1/2 cup sugar
- 5 egg yolks
- 1/4 cup unsweetened cocoa powder
- 1/4 cup milk chocolate chips
- 2 tsp cinnamon
- 1 tsp cayenne pepper
- 1/2 tsp chili powder
- 1 tsp vanilla extract
- pinch of salt

Start off my combining the cream, milk and whole vanilla bean in a saucepan. Bring to a low simmer over medium heat. Once it starts to simmer cover with a lid, take off the heat and let sit for 30 minutes. When the cream and milk has sat for 30 minutes or so take out the vanilla bean and place saucepan back over medium heat. You can rinse off the vanilla bean and save it for future recipes.

To the cream mixture on the stove, add in the 1/4 cup of sugar, 1/4 cup of cocoa powder and a pinch of salt. While that is heating up, in a heat safe bowl, combine the egg yolks and sugar. Whisk this together until thoroughly combined. Once the cream and sugar mixture begins to boil you will slowly add 1/2 cup of cream to the egg mixture while whisking constantly to that the cream does not cook the eggs. The sugar in the eggs should help with this too. Yeah, science, bitch! : P

When half of the cream has been added to the eggs you can place everything back into the saucepan over medium-low heat. Stir until the mixture thickens and coats the back of a wooden spoon.

In a separate heat proof bowl add the chocolate chips, cinnamon, cayenne pepper and chili powder. Then you will strain the hot custard mixture into the chocolate and spices. Stir until all the chocolate has melted and finally add the 1 tsp of vanilla extract. Once everything is combined, you will need to cool the ice cream base in a bowl of ice. Stir every few minutes and after about 15 minutes your base will be cool enough to cover with plastic wrap and place in the fridge up to 8 hours or overnight.

The next day you can take out the ice cream base and freeze according to the manufacturers instructions on your ice cream maker. From there you can enjoy the ice cream as soft serve from the ice cream maker, or place back in the freezer for a few hours until it has hardened a little. This ice cream is the perfect blend of spices and chocolate. I love that you get a little kick from the cayenne pepper at the very end of each bite.


This ice cream seems tedious, but once you get the hang of it, it's actually quite simple. This is the method I use for most of my ice cream bases and it delivers a smooth and rich ice cream each time. Hope you guys enjoy!!!

Peace.Love.Lauryn


Monday, September 30, 2013

Fall Wishlist

It is officially fall!! Even though we have plenty of warm days left in Texas, the 100 degree days are over...for now.  Some of my favorite things about fall are wearing boots, layering clothes, finally being able to see some rain, pumpkins, apples and changing the decor around the house. It's so hot in the summer that we put any home projects on hiatus until the weather starts cooling down a little. Here are a few things I want for this new season.

1. A garden in the backyard. I really need to start prepping a garden bed and getting some new flowers, veggies &  herbs to plant in the ground. Yard work is something I am not used to, but now that we have our house I am trying to learn as much as I can about it.


Remodeling, decorating, and more ∨

Consider a versatile murphy bed when looking for guest beds design, find the perfect desk chair, and work with a contractor in your area to create a fun yet functional home office.
Work with a home decorator when choosing area rug designs or hanging a new window blind in your home.

Currently I have a nice little herb garden with sage, basil, oregano, chives, parsley, rosemary and thyme. I have tried growing tomatoes and strawberries, but the plants never really flourished. My mom just got me a little Mexican Lime tree for my patio. I can't wait to see all of the little limes grow!


2. A great pair of boots. Ok, a couple great pairs of boots. Here are a few I would like to have.


Brown Boots from Modcloth            A pair of Minnetonka boots     A good pair of rain boots 

3.  A new jacket. Jackets are only needed for a few Months out of the Year, but it is always nice to have a comfy one on hand. My closet is filled with cardigans right now, and a jacket is a must have for fall.


Biker Jacket from H&M                 Green Trench Coat from Chicwish   

4. Some new cookbooks. I love cookbooks. I am not sure why I like cookbooks so much since you can find almost anything on the internet these days, but I always enjoy getting a new cookbook that I can read through and try recipes from. Here are a few I am interested in.


Flour Water Salt Yeast                          Ivan Ramen                         Ad Hoc at Home 

5. More workout clothes. Trying to keep working out and once my Insanity is over I would like to run and bike more. The weather in fall is perfect for exercising outside. I can't wait!!!                                                   


                                               shoes                                                           pants  


What are some things you guys are looking forward or want for this new season? It is the perfect time to change things around a bit. 

Saturday, September 21, 2013

Peanut Butter Oatmeal Chocolate Chip Cookies


Wow! That title sure is a mouth full, but these cookies are some of the best cookies I have ever made! David and I have different tastes when it comes to almost everything, and this cookie conquers all as far as the both of us are concerned. The peanut buttery saltiness, the hearty oats and of course the chocolate combine to make our ultimate chocolate chip cookie. 


I found these cute little mini chips while out shopping this weekend, and I just had to make some cookies to put them in. I stumbled across this recipe by Michelle at Brown Eyed Baker. In case you haven't heard of Michelle, I highly recommend you check out her recipes. She is my go to when it comes to sweets. Her recipe index is endless!!

I loved this recipe for its simple ingredients and how quickly everything came together. In about 30 minutes or less, these cookies were ready to be devoured. 

Now of course, I did not come up with this recipe.  Here is the direct link. 

I felt like I needed to post this recipe because it is so good. Sometimes it is hard to find REALLY good cookie recipes. They are all so different. Some are healthy, gluten free and/or raw, but I prefer the cookies that are primarily butter and sugar. That always seems to make a really good legit cookie. Which these definitely are! They have a peanut butter cookie like texture which is crispy yet very tender, and then you hit the oatmeal and chocolate chip which is my personal favorite. So incredibly good!!


The next day we had some friends over and made ice cream sandwiches with the cookie butter ice cream we made. They loved it, but who doesn't love homemade cookie ice cream sandwiches?!? By far my favorite thing about cooking is sharing it with others, so I hope you enjoy this recipe as much as we did!


Peace.Love.Lauryn

Tuesday, September 10, 2013

Speculoos Cookie Butter Ice Cream


Trader Joe's has this amazing stuff called Cookie Butter. It is made of Speculoos cookies, a spiced shortcrust biscuit type cookie that is popular in the Netherlands around Christmas time. Trader Joes is genius for taking these cookies and grinding them up to make this delicious cookie butter.  It is unlike anything I have ever tried before. If you have a Trader Joe's near you, I highly recommend you pick up some of this heavenly butter. Don't have a Trader Joes near you? No problem because you can buy it on Amazon too!


To make the cookie butter ice cream you will need:
*Makes 1.5 quarts of ice cream

- 2 cups heavy cream
- 1 cup milk
- 1 vanilla bean
- 1/2 cup sugar
- 5 egg yolks
- 2/3 cup cookie butter


First you start by making your ice cream base. I like to infuse the vanilla bean into the cream and milk to give it a great depth of flavor. Start by putting the whole vanilla bean, cream and milk into a saucepan over medium heat. Once the cream starts to simmer, place the lid on the saucepan and take it off the heat. Let this sit for about 30 minutes.


Once the cream has been infused you can take out the vanilla bean and save it for future use. Return the saucepan to the stove over medium high heat. While this is heating up you can separate your eggs and add the sugar to the egg yolks. Whisk these together until the mixture is light yellow and smooth.


Once your cream reaches a bare simmer it is time to slowly add it to the egg yolks. This is the tricky part because you don't want the hot cream to cook the eggs. So you will add the cream to the yolk and sugar mixture 1/2 cup at a time while whisking quickly so that the yolks don't start to cook. Keep whisking and adding the cream slowly until half of the cream has been added to the yolks.


You can now return all of the ingredients to the saucepan and place over medium low heat. Stir this mixture until it starts to thicken a little and coats the back of a wooden spoon.

You will then want to place the 2/3 cup of cookie butter into a large, clean and heat proof bowl. Strain the cream mixture through a fine mesh strainer into the bowl with the cookie butter. Slowly stir the two together. The hot cream should melt the cookie butter and slowly your ice cream base will turn a beautiful creamy cookie color.

Once the cookie butter is melted and combined with the cream you can place the bowl over ice and stir the mixture every few minutes until the base reaches room temperature. This will usually take about 10-15 minutes. Then you can cover your base and place it in the fridge for about 8 hours or overnight. This will help infuse some of that great cookie butter flavor into the cream. Once the base is nice and chilled you can freeze it per the ice cream maker's instructions.


For a firmer ice cream you can place it back in the freezer for a few hours, or enjoy right away for a soft serve ice cream. This is definitely one of my favorite ice cream flavors and it is perfect for the fall and winter seasons too! 


This was also the perfect ice cream for ice cream sandwiches!! Enjoy!


Peace.Love.Lauryn

Saturday, September 7, 2013

Orange Ginger Strawberry Smoothie


Smoothies!!!!! 
There is something so refreshing about a great fresh fruit smoothie. Not only does it taste great, but it's really good for you too.


This morning I made this yummy orange, ginger and strawberry smoothie. I got a huge bag of organic oranges from the store on sale because they were already getting a little soft.  So I thought they would be perfect for juicing and throwing into some of my usual morning smoothies since I don't buy bottled juice. I was also reading online about all of the different health benefits of fresh ginger. It is good for tummy aches, inflammation,  aiding in digestion and it's one of those super foods that fights cancer.

For this yummy juice you will need:
- 3 whole oranges (mine were organic valencia oranges from Trader Joes)
- 5 Strawberries
- a small sliver of fresh ginger about the size and width of your pinky nail (a little goes a long way)
- a handful of ice cubes
- 2 Tbsp honey


First I sliced the oranges in half and squeezed the juice into the blender. I used a fine mesh strainer over the blender to avoid getting excess pulp and seeds into the juice. Then I added the strawberries, ginger, ice cubes and honey. Blend it all up and enjoy!


This is a great smoothie for a quick and easy breakfast or as a snack during the day. All of that Vitamin C will be sure to give you an energy boost too!

~~~~~~~~~~~~~~~~~~~~~~~~~~~~~~~~~~~~~~~~~~~~~~~~~~~~~~~~~~~~~~~~~~~


I had such a great morning going to the Farmer's Market and then grocery shopping. The mornings are getting a little cooler and it makes me really excited for fall! So I picked up these gorgeous roses and some Rudbeckia flowers to add a little fall color to the kitchen/dinning area.


Hope you guys are enjoying your weekend and maybe some slightly cooler weather. It is still pretty hot in Texas, but maybe the 100 degree days are behind us. Staying hopeful that we get some rain soon too.


Peace.Love.Lauryn

Tuesday, September 3, 2013

Challah Bread Weekend

Last week I had been seeing Jonathan from The Candid Appetite post all about his upcoming Challah Bread recipe on Instagram so when he finally posted it, I knew I had to try it!

 The only loaf of bread I have ever made before is a banana bread. I am a novice baker so I was a little skeptical that I could bake a whole loaf of this beautiful Challah bread, but maybe, just maybe I could do it. You never really know unless you try, right? So I looked up the recipe and what do you know, it makes two whole loaves of bread!! I took a deep breath and composed myself. I had a three day weekend, which means I have plenty of time to dedicate to this bread making thing. So I dug right in.

If you would like the recipe, please check out the Challah Recipe on The Candid Appetite. Jonathan does a much better job of explaining this recipe and he is an amazing photographer so his pictures are absolutely incredible!! Most importantly there is braiding involved, which I totally screwed up! Ooops! I screwed this up because I did not follow Jonathan's directions. I read through it really fast thinking I had it, then when it came time to braid I simply went with my instincts which were to braid the thing backwards. So if you want to braid it correctly, follow Jonathan's step by step instructions carefully, and I am sure you will get it!

I had so much fun making this bread and even more fun eating it!! Here is what my process looked like.

 First I had to gather the ingredients.


 Yes the recipe calls for that much flour. We're making two loaves here remember!!


 The most important thing about making bread is to make sure the yeast is activated. Sounds like something out of a Sci-fi movie, but don't worry it won't crawl out of the bowl like some foamy alien creature trying to take over planet Earth. As you can see the yeast, water & sugar mixture is all foamy which means the yeast has been activated. We are off to a good start. Hooray!!!


Once everything is combined, you must knead the dough for about 7-8 minutes or until you have a smooth ball of dough.


Then you place the dough in an large oiled bowl, coat the dough in oil and let the dough rise for 1 hour.  After 1 hour, you punch the dough down and then let it rise for an additional 30 minutes.


So while the dough was rising, we took a little kitty break and squeezed in a little cat nap too.


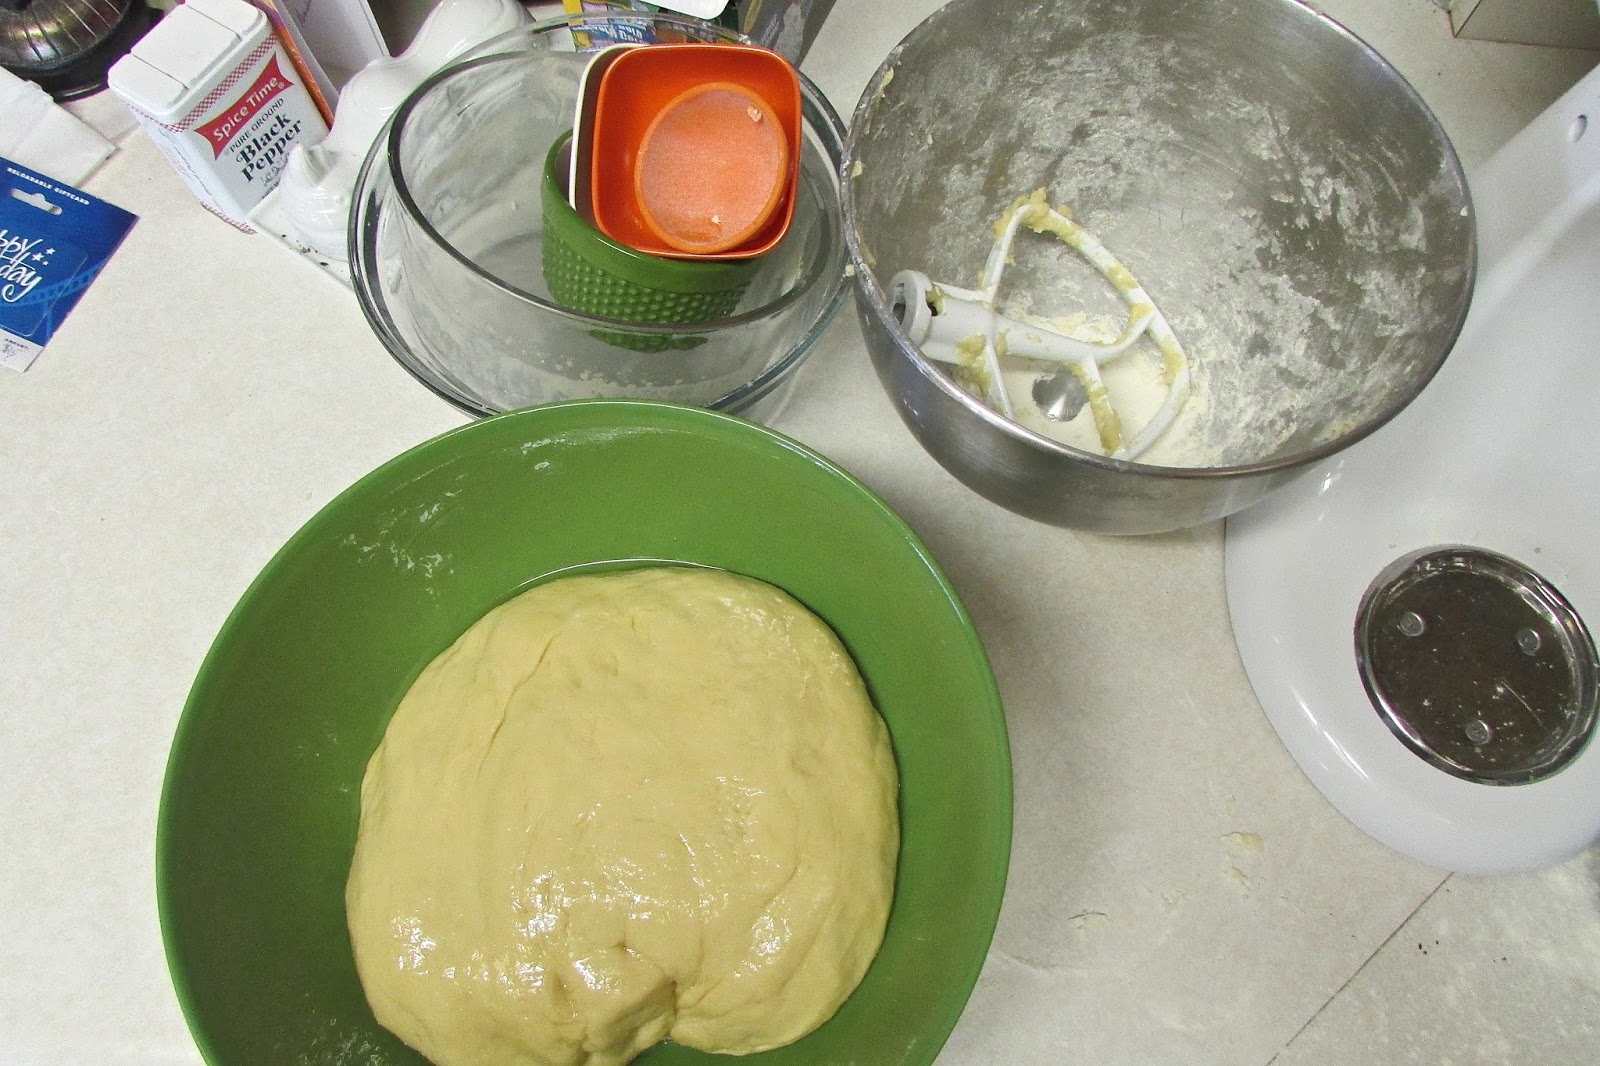
Once the dough sat for an hour and a half. This is what it looked like. I used the biggest bowl I had on hand and it still proofed over the bowl. This is awesome!!


So I cut the dough to form two halves, then I cut one half into halves and so on and so forth until I had six semi equal pieces to braid my one loaf.  


I braided it and then liberally applied the egg wash. Once it baked it came out looking like this. So lovely!


There was so much delicious bread I hardly knew what to do with myself besides devour as much as I could right there on the spot!!

But alas, I knew we couldn't eat a whole loaf of bread all by ourselves in one day. So I thought of a few ways we could make this bread last and make it into a few different meals.

The first thing I thought of was making bread crumbs with all of the crispy end pieces. So I did!


I used these bread crumbs to make some greek lamb meatballs that went onto a salad with some homemade tzatziki sauce as the dressing. We ate slices of the Challah bread on the side, of course! Challah bread two ways for one meal. Yes, please!!!


Then the next day I made the dreamiest stuffed french toast. One was stuffed with apples and cinnamon and the other with raspberries and cream cheese. All homemade by yours truly. It was the best breakfast I have eaten in a long time and it looked so pretty too!!


After all of that there is still a good size chunk of bread that I am sure will become another french toast breakfast. The other loaf of bread I took over to David's parents house because I knew it would be put to good use there and nothing would be wasted.

I still can't believe I baked two whole loaves of Challah bread!! I can't wait to spread my little baking wings and try some other bread recipes. 

Don't forget, this recipe is not mine, but comes from Jonathan over at The Candid Appetite. Feel free to check out his site. You can find the Challah recipe here. All of his pictures are beautiful, his recipes are clever and oh so delicious and he does everything in detail step by step. He may go off on tangents sometimes, but you will find yourself laughing right along with him. He is a charming dude all around. 

Hope you guys enjoy!!!

Peace.Love.Lauryn