Thursday, May 22, 2014

Super Simple Jalapeño Cheddar Cornbread


This is my go to cornbread recipe. Ever since I discovered this cornbread, I have never made store bought cornbread mix ever again! This recipe was just too easy and too delicious to make it any other way. It is always light, moist and bakes up perfectly. This time I decided to add some fresh jalapeño and Tillamook sharp cheddar to the mix. This took the cornbread to the next level!!!! I de-seeded the jalapeño so it wasn't spicy and it gave the cornbread a nice flavor, plus cheddar makes everything better, right?!?! So here is how you can make this super simple cornbread recipe from scratch.


You will need:
- 1 cup corn meal
- 1 cup AP Flour
- 1 tsp salt
- 2 eggs
- 1/2 cup vegetable oil
- 2 tsp baking powder
- 2 Tbsp Sugar
- 1 cup milk
- 1 jalapeno de-seeded, de-veined and chopped (if you want your cornbread to be spicy, then leave some of the seeds and veins)
- 1 cup shredded cheddar cheese

*This recipe makes 9 good size pieces of cornbread. Don't need that much? The recipe is easily halved and you can use a smaller glass dish and bake it for about 20-25 minutes. Just keep your eye on the oven because some oven's temperatures and times vary. 

Preheat Oven to 400 degrees Fahrenheit 

Begin by combining all of the dry ingredients (corn meal, flour, salt, sugar, powder) into one bowl and the wet (eggs, oil, milk)  ingredients into a separate bowl. Stir each until combined and then add the wet mixture to the dry ingredients. Stir together until there aren't any more dry spots. Then you will want to add the chopped jalapeño and shredded cheddar.  Stir to combine. 


Poor the mixture into a greased 8"x8"glass pan. I greased my pan with a little butter, but you can use cooking spray, coconut oil or whatever you normally use. 


                                 Bake in the oven for about 30-35 minutes or until golden brown. 
                You can also give it the toothpick test to make sure it is cooked all the way through. 
               Just stick a toothpick in the center and if it comes out clean then the cornbread is ready. 


Now all thats left is to let the cornbread cool for about 10-15 minutes, slice and enjoy!

Peace.Love.Lauryn

Thursday, May 1, 2014

Record Store Day and Other April Happenings

Seems like April flew right by us. So much going on this past month that I can hardly keep up. Record Store Day took place on April 19th this year, and even though we didn't go to any brick and mortar stores, we were still able to grab a few things that we wanted online.


I got Mae - Destination Beautiful from Shop Radio Cast. They did a limited to 500 blue/gold swirl edition of Mae's 2003 album Destination Beautiful and I knew I had to have it. I've been wanting Mae's The Everglow, but I'll take this one too. The album matches the cover perfectly and it looks even better in person.  :)


I was also able to grab the Cake vinyl box set.  Cake was going to save 200 of the 900 boxes to sell on their website to fans who couldn't get one on RSD, so I was lucky enough to snag one. In order to get the link, you had to sign up for their email list and they would send you a special link to order the box. This was really the only item that I wanted for RSD, but I knew with the limited quantities that I wouldn't be able to get one at my local record store for RSD unless I stood in line all night, and was one of the first few people in line. So I'm very glad that I was able to pick this up online for the same price, if not cheaper than in stores. The box set arrived yesterday, and I can't wait to spin all of these this weekend!!!!


Other happenings this month is that instead of doing our regular date nights, we have invited our friends to go along with us on double date night. The first week we went to Mellow Mushroom. We had tried Mellow Mushroom before in a different city and let's just say that I was not impressed. So we had decided to try it in our city since it was fairly new. The pizza this time around was much better, but I still would rather eat at a locally owned pizza joint. To this day, my favorite pizza place in San Antonio is Freetail. You can't beat locally brewed beer and awesome food, in my opinion.


The following week we decided to try out our friend's favorite sushi place, Goro's Sushi in San Antonio. Both David and I are not very big sushi eaters. I have a hard time getting David to eat any seafood other than fresh crab so this was new and exciting for us. We tried a few different rolls and enjoyed the in house warm saki. Everything was delicious and I could definitely see us eating sushi more often in the future.


I haven't been making much ice cream lately as we have discovered Talenti Gelato. Although it is expensive, it is completely worth it. They use all natural ingredients and have a great selection of flavors. Of course the cats enjoyed it too.


So not only are allergies raging in San Antonio during the month of April, but we kicked off the Spurs Playoff Season!!! We were able to go to the first two home games and had a blast. San Antonio loves their Spurs and we are glad to be apart of it. So I will finish off this post with a classic GO SPURS GO!!!!


Peace.Love.Lauryn


Monday, April 14, 2014

Happy 1 Year Blog


This month marks my one year of blogging. Sorry I've been gone for awhile, but sometimes you just need a little break. We've been working nonstop on the house. Finally painted the main living area and halls and we are having new flooring installed. I am so incredibly excited to finally be done with the dingy carpet in our living room. We found a great deal on an installation and picked out a beautiful dark wood laminate flooring. I can't wait to see how it turns out. Working on the living room has been the most challenging of projects thus far. Tearing out the old carpet and laminate was a nightmare thanks to our naughty kitty cats, but hopefully replacing all of the old, stained flooring will help in that department. We've been working on the decor of the living room as well. Bought some new prints, curtains and another 4x2 Ikea expedit for additional storage. Our vinyl collection is continuously growing so more storage is a must.


Here is our house in construction mode.

And here is the new flooring. It makes a huge difference in how our house looks and we couldn't be happier. 


Our cats also really love it. 


I also bought some new herbs and flowers for the yard and garden. I started them from seedlings and they are doing great. Not all of my plants have been as successful,  my tomato plant from last year has a fungus and I am afraid it's going to quit on me. It grew rather large while it was being stored in the kitchen over the winter, but as soon as Spring hit, a brown fungus took over the plant and I can't get it to stop. It does have two little green tomatoes on it so I am hoping for the best. I also bought a hanging succulent to place in the house, but it wasn't getting enough light and slowly began to die on me. I placed it outside so hopefully it will begin to perk up. You live and you learn.


It's been a busy last couple of months, but I am looking forward to all of the things that this year has to offer. I am hoping to turn this blog into not only a place for recipes, crafts, etc but a place to write down thoughts and to use more of like an online scrapbook of sorts. Who really knows what will happen in the future. I do hope to continue blogging, just not sure how often or what exactly about. The last thing I want is for blogging to feel like a chore. It's meant to be fun and I want to keep it that way.

To close out this post. Here are a few of my latest obsessions.

It's strawberry season so strawberries all day every day!


New rugs and decor for the house. Found this rug and two others on clearance at Target. I think our cats like them more than we do. 


Gin and Grapefruit Cocktails. So good and fresh grapefruits are a must this time of year!!


Hope you guys have a great month!!!

Peace.Love.Lauryn

Friday, February 21, 2014

Blackberry Cheesecake Ice Cream


I have to admit that I have never made a cheesecake before. Don't get me wrong, I love me some cheesecake, but I just never had the opportunity or desire to make one myself. I have on the other hand made cheesecake ice cream!

The first one I made was a strawberry cheesecake ice cream. It was sooo good with the little graham cracker pieces and delicious cream cheese ice cream base. I just had to make it again! This time I decided to do a blackberry cheesecake ice cream since blackberries are in season right now, but you can use any berry you like interchangeably as the recipe will stay the same. 

This process is very time consuming and may take a day or two, but the outcome is well worth the wait. 

Here is what you will need:

For the berry puree:
- 2 pints fresh blackberries or approximately 2-3 cups of any berry you like (fresh or frozen)
- 1/3 cup sugar or less depending on how sweet the berries are

For the graham cracker crust:
- 1 cup graham cracker crumbs (about 1 package, chopped into pieces)
- 1 Tbsp sugar
- 1/4 cup melted butter

For the ice cream base:
- 2 cups heavy cream
- 1 cup milk ( I use 2%)
- 3/4 cup sugar
- 5 egg yolks
- 1 package cream cheese (8oz.)
- 1 Tbsp fresh lemon juice
- 1 tsp vanilla extract


Start by making your ice cream base. Place the heavy cream, milk and half of the sugar ( 6 Tablespoons) into a saucepan over medium high heat. 


Next you will want to separate the egg yolks from the whites and place the 5 egg yolks and remaining sugar (6 Tablespoons) into a heat proof bowl and whisk the eggs and sugar together.   In a separate heat proof bowl add the cream cheese and place a strainer over the top. Return to the milk and cream and see if the mixture is steaming yet. Once the cream and milk start to steam then a slow simmer is not too far behind it. This is how you know the cream is ready to be added into the eggs. 


Slowly add 1/3 cup at a time of the cream mixture into the eggs and whisk quickly to ensure the eggs do not cook. Keep whisking and adding cream to the eggs 1/3 cup at a time until more then half of the cream has been added. Then return everything to the saucepan over medium low heat and continue to stir until the custard coats the back of a wooden spoon. Once the custard mixture thickens and coats the back of a spoon, take off the stove and strain the mixture into the bowl with the cream cheese. Stir the custard and the cream cheese together until smooth. You may have a few teeny tiny pieces of cream cheese that do not melt, but it will be ok. Place the mixture into a bowl of ice water and let cool. Once the mixture has cooled to room temperature then you can cover the bowl and place in the fridge for 2 hours or overnight. 

Next, you can begin to prep the berries and the graham cracker crust. Start by combining the berries and sugar in a small saucepan over medium-high heat. Bring the berries and sugar to a simmer, reduce the heat to medium low, and let it simmer on the stove top for about 30 minutes. Then set it off to the side to cool. Once the berries are cool enough, place them into a food processor or blender and blend until smooth. 

Next, preheat the oven to 350 degrees Fahrenheit.  Place the graham crackers, sugar and melted butter into a food processor and processes for about a minute or until everything is combined. Place the mixture on a cookie sheet and bake for about 15 minutes. Once done, take the graham cracker mixture out of the oven and set off to the side.


Once the custard mixture is completely chilled, take out of the fridge and add the lemon juice and vanilla extract. Stir to combine and then freeze per the manufacturers directions for your ice cream machine. Once you have the cheesecake ice cream, then you can start adding the extra ingredients.


To get the swirl effect, I took a large separate bowl and layered the ice cream, graham cracker crumbs and berry puree, and then I layered it again with ice cream, graham cracker and berry puree. Then take a spoon and fold the ice cream together two or three times until it is all slightly mixed together. 

Place the large bowl back into the freezer and freeze for a few more hours or overnight, unless you just cannot wait and must take a big spoonful of the soft serve ice cream like I did. :)


This is one of my favorite ice creams to make and eat. It takes awhile, but it's the best cheesecake ice cream I have ever had. I hope you guys think so too!! Enjoy!

Peace.Love.Lauryn


Monday, February 3, 2014

Meyer Lemon & Cilantro Hummus


Last night I whipped up some meyer lemon and cilantro hummus for the week. I love using hummus on sandwich wraps and as a dip for veggies or pita chips. Hummus is incredibly easy and a lot cheaper to make yourself at home. This hummus recipe is one of my favorites because it is so simple, but packed with a lot of flavor.


Here is what you will need:
- one 15 oz. can garbanzo beans drained
- 1/3 cup chopped cilantro stems & leaves
- 2 cloves garlic
- 1/2 tsp cumin
- 1 tsp kosher salt
- juice from one meyer lemon strained
- 1/3 cup Tahini
- 3 Tbsp olive oil


Combine all ingredients into a food processor or blender and blend until smooth, about 5 minutes. You can add additional olive oil for a smoother texture. Scoop into a re-usable container and top with additional cilantro, olive oil, paprika and/or cayenne pepper. Enjoy!


Thursday, January 23, 2014

January Record A Day

If you follow me on instagram then you have probably seen that I have been posting a lot of records this month. Well, at least more than usual. One of the guys in a forum community that I am a part of (www.vinylcollective.com) created this great idea of posting a record each day that fits within the requirements for that day.  You can also check out his website at http://recordaday.com and his blog http://recordaday.com/blog/ .


Here is what January looked like. 


I was thrilled that my collection was extensive enough that I had something different to post each and every day. I had way too much fun doing this. I would look forward to waking up and posting my record for that day. This is such a great idea for many reasons. One, it familiarizes you even more with your record collection. Sometimes it's hard to remember what you have. You buy it, you listen to it a few times and then back on the shelf it goes until you're in the mood to listen to it again. Two, you get to listen to at least one new record each day. A lot of these albums I have not listened to in awhile, so it was nice to sit down, relax and listen to the record I was going to post for that day. Three, it's just plain fun and you get to show off your record collection to other music/vinyl lovers. 

January is almost over, but if you are someone who collects vinyl or you are interested in participating there is already a list posted for February. Check it out! 


If you decide to do this, be sure to link your post with #JanuaryRecordADay or #FebruaryRecordADay . I'm afraid I won't be participating for the month of February. I just don't have that many records and I don't want to repeat anything that I have already posted. I will still be browsing through the hashtag each day to see what people post, and I am sure that I will still be posting records of my own, just not every single day like I did in January.  If you are interested in seeing what I do have, you can check out my collection on Discogs. You can also check out my instagram.  

Hope you guys had a great start to the new year and hopefully I will have some recipes/experiences to share soon.

Peace.Love.Lauryn

Wednesday, January 8, 2014

Champagne Lobster Risotto ~ Homemade Dinner Date Night ~


Even though we usually eat dinner at home together, sometimes it's nice to make an extra special decadent dinner for a little at home date night. For Christmas I got a wonderful cookbook, Kitchen Revelry by Ali Larter. There was a recipe for champagne lobster risotto that I had been eyeing as a perfect date night type of meal. So our last Sunday of 2013, I decided to take the day and dedicate it to this dinner. I found some lobster tails on sale at the market so I knew this recipe would be perfect. Plus I had never made risotto before so I was up for the challenge.


For starters, you will need to cook the lobster tails and make a lobster stock. (If you don't have the time to do this you can use Better than Bouillon.) I used Emeril Lagasse's recipe as a guide.


For the Lobster Stock:
- 2 lobster tails
- 1/8 cup vegetable oil
- 2 ribs celery
- 6 cherry tomatoes cut in half
- 1 yellow onion, peeled and quartered
- 1 carrot peeled and chopped into large pieces
- 2 sprigs fresh thyme
- 1/2 small fennel bulb
- 1/2 head of garlic cut horizontally
- salt and freshly ground black pepper to taste
- water to cover

First you want to steam your lobster tails. I steamed them in a large stockpot/steamer for 10 minutes or until they turn a bright red. Take them out and allow the tails to cool. Once they are cool enough to handle you can cut down the back of the lobster tail with scissors and remove the meat. You will also want to devein the lobster tail and then set aside in the fridge for later use.

With the empty lobster shells, you can throw those in a stock pot with the vegetable oil and sauté for about 5 - 10 minutes. Add in the celery, tomatoes, onion, carrot, thyme, fennel, garlic, salt and pepper. Add enough water to cover all the ingredients plus 2 inches. Bring the mixture to a boil, then reduce the heat and let simmer until the liquid is reduced in half. About 4 hours. Taste the stock and add more salt and pepper to taste.

Once the liquid has reduced and is seasoned, strain the stock through cheesecloth and set aside for the risotto.

*Note: This lobster stock made more than what the risotto recipe called for so I let the stock cool, poured it in a reusable container and refrigerated it for a few hours. Once the stock is nice and cold you can transfer it to the freezer and it will keep for a few months.


For the Champagne Lobster Risotto you will need:
*Note: The original recipe was 4 servings, so I halved everything for just the two of us.

- 2 Tbsp butter
- 1/8 cups extra virgin olive oil
- 2 cloves garlic finely chopped
- 1/4 cup diced white onion
- 1/4 cup chopped green onions (white and light green parts only)
- 1 cup arborio rice
- 1 1/2 cup Brute Champagne
- 1 3/4 cup lobster stock
- 1 cup grated parmesan
- lobster meat from two tails cut into bite sized pieces
- 1 1/2 Tbsp fresh chopped parsley
- salt and pepper to taste
- a pinch of red pepper flakes (optional)

*Also if you don't like Champagne or don't drink, please feel free to substitute the champagne with additional lobster stock. The recipe will still taste delicious!

Start by melting the butter with the olive oil in a large saucepan over medium high heat. Add in both onions and sauté until soft and translucent. Add in the garlic and stir for 1 minute. Add in the rice and stir for a few minutes. Add in the champagne and bring it to a boil. Reduce heat and simmer for a few minutes, stirring constantly. Add in the lobster stock and bring it back up to a boil. Reduce heat to medium low and simmer until the rice is tender, stirring frequently, about 25-30 minutes. ( The important thing to remember when making risotto is to stir constantly. If you notice the risotto getting a little dry then you can add more lobster stock. ) Reduce the heat to low and add in the parmesan, lobster and red chili flakes if you decided to use them. Stir the risotto for a few minutes until it is thickened and reached a desired consistency, but you still want it moist and creamy. Season to taste with additional salt and pepper. Transfer the risotto to a shallow bowl, sprinkle with parsley and serve.


Don't forget your glass of champagne to sip on while you cook! 
I added a few pomegranate seeds for show. 


I set the table in between stirring the risotto. Make sure you stir frequently and add any additional stock as needed to keep it from getting too dry. 


Chop up the lobster meat into bite sized pieces and gather the final ingredients to be added.


I also sliced some lemon for a garnish. 


Light some candles and enjoy the indulgent and extravagant fancy dinner you just made for you and your sweetheart!

Peace.Love.Lauryn


Saturday, January 4, 2014

Orange Cranberry Bread


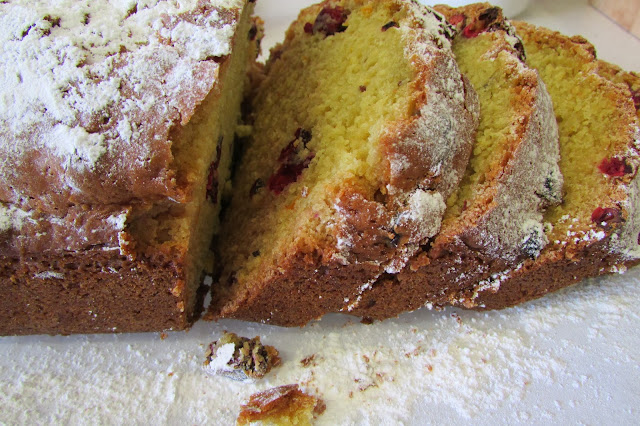
I made this delicious orange cranberry bread this morning. It was the perfect orange sweet bread with just a hint of chewy tartness from the cranberries and a beautiful sugary crisp crust. 


I used the dried cranberries from the cranberry garland I made for our Christmas tree this year. I took down the tree and ornaments on Wednesday this last week and I soaked the cranberries in a sink full of water to get off all of the dirt and dust that had accumulated on them. After rinsing them off really good I stuck them in the fridge to use this weekend. I knew I wanted an orange cranberry bread since the cranberries were dried, and I had some beautiful oranges from grocery shopping last weekend that needed to be used.


Here is what you will need:

- 2 cups all purpose flour
- 1 cup sugar
- 3/4 tsp baking powder
- 3/4 tsp baking soda
- 1/2 tsp salt
- 3/4 cup fresh squeezed orange juice ( I used two large oranges)
- 1 Tbsp orange zest ( about 1 orange worth)
- 2 Tbsp coconut oil (or vegetable oil)
- 2 Tbsp milk (any kind)
- 1 egg
- 1 1/2 cup dried cranberries (or whatever kind you have on hand)


This year I am trying to focus on getting better at my mise en place. In case you don't know what that means it is fancy french phrase that means "putting in place" or to set up. I usually get all my ingredients out, but then just throw them together when they are needed. This year I'm going to try and measure out all my ingredients separately and then just be able to add them when they are asked for. It seems to take a lot more time and dishes to do this, but hopefully it will help me better understand each ingredient and how they effect the recipe. Or maybe I'm just being crazy. Who really knows, right? 


So first you want to preheat the oven to 375 degrees Farenheit and grease a 9"x5" loaf pan. In a large bowl whisk together the flour, sugar, baking powder, baking soda and salt. 


To the dry ingredients,  add in the orange juice, orange zest, oil, milk and egg. 


Mix all ingredients until just combined and stir in the dried cranberries. I decided to stick the dried cranberries in a food processor and give them a few little pulses to break them up a little, but you can bypass this step and just add them into the batter.


Spread out the batter evenly into the loaf pan and bake for 45-55 minutes. Check for doneness by inserting a toothpick into the center of the bread. If the toothpick comes out clean, then it is done. 


Take out of the oven and cool on a wire rack for about 15 minutes. 


Once cool, dump the loaf out of the pan and allow to completely cool before slicing. I added a sprinkle of powdered sugar to the top of my loaf for a little added sweetness and decorative accent. 


Slice and enjoy with a glass of milk or coffee. This bread is also great as a little mid-day snack.


Hope you guys enjoy!!

Peace.Love.Lauryn